

Create a GitHub repository and where the Developer will upload the webpages.

The developer will upload the webpages needed to be publish along with a dockerfile which will copy the web pages into the images which when build will contain a httpd server installed and running automatically.
From centos
WORKDIR /root/workspace
COPY . /var/www/html
RUN yum install httpd -y
CMD [ "/usr/sbin/httpd","-D","FOREGROUND" ]
Expose 80
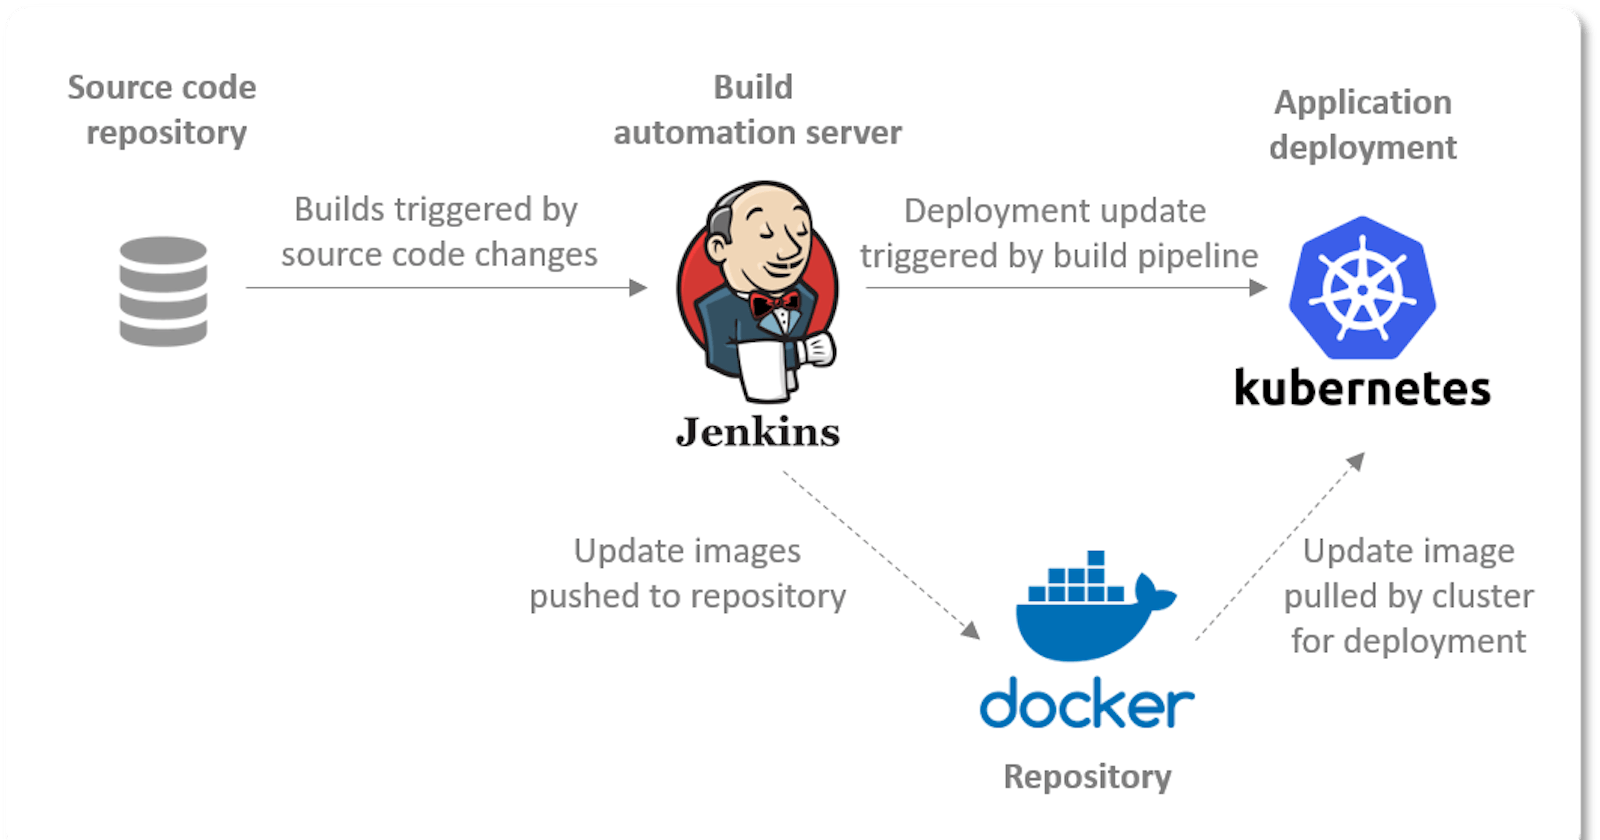
Now lets start building our jobs in Jenkins...
Job1 : Pull the Github repository automatically when some developers push repository to Github.
1.1 Create the new image dynamically for the application and copy the application code into that corresponding docker image
1.2 Push that image to the docker hub (Public repository)
( Github code contain the application code and Dockerfile to create a new image )


I'm using the GitHub hook trigger for the triggering of this job, you can refer to the job1 of the below article for the setup of the webhooks in GitHub.

here the Dockerfile which was pilled from the git repository is build and pushed into the Docker repository in hub.docker.com .

Job2 : ( Should be run on the dynamic slave of Jenkins configured with Kubernetes kubectl command): Launch the application on the top of Kubernetes cluster performing following operations:

here we first need to build a Docker image which will contain the Kubectl application
but before building this image we need these 4 files in the same folder as the Dockerfile.
then you have to configure your docker.service file so the jenkins can run the slave node using the docker configuration in your linux system.
For that use the following command...
vim /usr/lib/systemd/system/docker.service
and add the following inside the red boundary in the below image...

now lets move to the rest of the settings.
config file :
apiVersion: v1
kind: Config


clusters:
- cluster:
    certificate-authority: /home/jenkins/ca.crt
    server: https://192.168.99.106:8443
  name: mycluster


contexts:
- context:
    cluster: mycluster
    user: jenkins


users:
- name: jenkins
  user:
    client-certificate: /home/jenkins/client.crt
    client-key: /home/jenkins/client.key
Dockerfile :
FROM centos
RUN yum install sudo -y


# Macking Package-repository up to date
RUN yum update -qy
RUN yum install  git -y


# Installing a SSH Server
RUN yum install -y openssh-server
RUN mkdir -p /var/run/sshd


# Installing JDK
RUN yum install java-11-openjdk-devel -y


# Creating and adding Jenkins user
RUN useradd jenkins
RUN echo "jenkins:jenkins" | chpasswd
RUN sed 's@session\s*required\s*pam_loginuid.so@session optional pam_loginuid.so@g'  -i /etc/pam.d/sshd
RUN mkdir /home/jenkins/.m2
RUN echo "jenkins ALL=(ALL) NOPASSWD:ALL" > /etc/sudoers.d/jenkins
RUN chmod 0440 /etc/sudoers.d/jenkins
RUN ssh-keygen -A


ENV NOTVISIBLE "in users profile"


RUN echo "export VISIBLE=now" >> /etc/profile
RUN rm /run/nologin
RUN chown -R jenkins:jenkins /home/jenkins/.m2/
RUN curl -LO https://storage.googleapis.com/kubernetes-release/release/`curl -s https://storage.googleapis.com/kubernetes-release/release/stable.txt`/bin/linux/amd64/kubectl
RUN chmod +x kubectl
RUN cp kubectl /usr/bin


WORKDIR /home/jenkins


COPY ca.crt /home/jenkins
COPY client.crt /home/jenkins
COPY client.key /home/jenkins
COPY config /root/.kube/config


RUN sudo chown -R jenkins /root/.kube


EXPOSE 22
CMD ["/usr/sbin/sshd", "-D"]
now build a image using...
docker build -t corruptgenius/kubectl:v1 .
here " . " defines that the Dockerfile is in the current folder
now we have to configure the jenkins cloud, for that go to
Manage Jenkins >> Manage nodes and cloud >> configure clouds >> Add a new cloud (select Docker)
for this you need a docker plugin .


if you will look in the Dockerfile for kubectl image, i have added a user called jenkins and set its password as jenkins, that is what i have given in the SSH credentials in the cloud configuration.
lets build the job2...


these commands will deploy kubernetes pods in minikube using the httpd image we build in job1...

you can check the came in the minikube...

now to check the deployed website use the Exposed PORT in the service/myweb
to find the IP of you minikube use...
$ minikube ip
use the minikube IP with the given port >> http://<minikubeIP>:<Exposed-Port No.>

now lets set a notifier for this job, if the job is build successfully then a email will go to the developer stating that the build was successful and vice-versa.


for this email notification to work you will need the email, email extension and email extension template plugins to be installed in the jenkins.
then follow the following steps in the below article to configure the email settings...

now, after all the settings have been done, if the build of job2 was successful you will receive this email..

Build View :

EndFragment